OO Nav Drawer Design Exercise – Part 1

In this three part article we are going to work through an OO design exercise in some detail. We will be designing a mini-model that backs a drawer navigation system such as the one in figure 1.

mio-staging_mio-components_1568406561463_assets_1nsuL8VDpBW_LZYXgabK1H0uq6icmmKYt_nav-drawer-introFigure 1

In part 1 (this part) we will identify the main classes and their relations. In part 2, we will work out how to construct objects from this class structure in an immutable manner. In part 3, we work out an extension of the model.

Let us start with the simplest bit. The navigation system shows a list of links, each with a distinct ID and a human readable label as shown in figure 2.

controller-example-02-4

Figure 2

Note that in the real world there would be several classes for model, controller, view model, etc. For the purpose of this article, we will use the Nav class to stand in for this set of classes. So the Nav class shall be responsible for providing the NavLink list as well as handling the selection of a link.

Each link is associated with a controller that is supposed to take over the control of the main content area when the link is selected. This association is shown in figure 3.

controller-example-03-2

Figure 3

Now, what happens when a link gets selected? How does the Nav know that it needs to switch to the associated controller? One solution commonly implemented in some of the popular UI toolkits is that the view passes the ID of the selected link to the Nav. To make things more interesting, let us go a different route and add the selection behavior to NavLink instead of just using it as a POJO.

Let us add a select() method to the NavLink, which is to be called by the view when the link is selected. How should the select() method be implemented? The naive solution is to have it directly call on the Nav. This introduces an unnecessary dependency from the simple NavLink class on the whole set of navigation classes. Thus, we add an associated Listener interface to the NavLink in order to abstract out, from the NavLink point of view, who handles the selection. Our design now is depicted in figure 4.

controller-example-04

Figure 4

So far so good? There is one remaining issue, which is how to construct instances of these classes. As usual, we would like to create immutable objects whose fields are all final. However, there is an issue with the design in figure 4 that makes this non-trivial. The issue is that there is an implicit cycle in the design. Pause a minute and try to spot it.

To construct a NavLink you need to have an instance of the Listener interface, which in this case is implemented by a Nav instance, and to construct a Nav instance you need to pass it the NavLink list.

We address this issue in part 2.

Modern Programming Languages Compared

Today, I have given this presentation on modern programming languages. This work builds on previous posts about Kotlin. The presentation expands on the previous content by comparing Kotlin features to those of other modern languages including Go, Groovy, and Swift. Some commonalities are extracted pointing out a trend in modern language design.

Deploying Spring Boot App on Elastic Beanstalk

Just trying out some new AWS services that I have not worked with before. From the AWS docs it sounded like Elastic Beanstalk (EBS) is a pretty easy service to use, and indeed it is. I had written a trivial Spring Boot app that exposes a couple of REST endpoints and it seemed like a good app to start with.

First, I prepared the jar for deployment using:


mvn package

Then, I just went through the EBS wizard accepting most of the defaults, uploaded the jar, and started the app. The dashboard is quite useful with health status, event logs, and stats.

Hitting the app in my browser got a “502 Bad Gateway”. Digging to understand the structure behind the Beanstalk deployment, I found the following:

  • Nginx is used for load balancing
  • The load balancer listens on port 80
  • It forwards requests locally to port 5000

So, the simplest solution was to change the Spring application.properties to include:


server.port=5000

And the application worked! I am yet to experiment with the full breadth of features it provides, but so far Beanstalk is pretty impressive.

(P.S. This post helped verify my solution).

beanstalk

From Java to Kotlin, with Love – Part 3

In parts 1 and 2 we explored, from a Java point of view, features of Kotlin that makes it both a concise and safe language. In this article, we will compare and another aspect to Kotlin with Java which is conditionals.

I always cringe when I see an if statement that looks like this:

if (someCondition)
   someVariable = value1;
else
   someVariable = value2;

In this situation I am a big fan of the shorthand ?: ternary operator. I would always rewrite the above snippet more concisely to look like this:

someVariable = (someCondition) ? value1 : value2;

It is indeed more concise but it looks a bit foreign and less expressive than the if statement.

In Kotlin, the if statement is an expression in itself, so you can combine the expressiveness with the brevity as follows:

someVariable = if (someCondition) value1 else value2

So you can write a function that looks like this:

fun someFunction() {
    return if (someCondition) value1 else value2
}

This is pretty neat especially when combined with the shorthand for single-expression function declaration:

fun someFunction = if (someCondition) value1 else value2

What is even nicer is the when expression, which is much more powerful than the classic switch statement. Let us take an example:

var obj: Any
when (obj) {
    10          ->  println("Dime")
    "Merci"     ->  println("That is French!")
    is Long     ->  println("Long")
    in 1..(y-1) ->  println("Less than y.")
    else        ->  println("Alien creature.")
}

There quite a few advancements over a switch statement:

  1. The variable used can be anything, and not just something convertible to an integer as in Java.
  2. The value in each matching case can also be of any type, or even an expression and not just a constant that has to be determined at compile-time.
  3. The else clause is mandatory, unless the compiler can prove that the cases cover every possibility. In a typical switch the default clause is optional, which can cause some cases to go unhandled unintentionally.
  4. And of course, there is no case keyword, and more importantly there is annoying break required after each case.

Like the if statement, when can be used as an expression, so the previous block may be written like this:

var obj: Any
var message: String = when (obj) {
    10          -> "Dime"
    "Merci"     -> "That is French!"
    is Long     -> "Long"
    in 1..(y-1) -> "Less than y."
    else        -> "Alien creature."
}
println(message)

Pretty powerful!

From Java to Kotlin, with Love – Part 2

In part 1 of this series we explored some of features of Kotlin that make it an expressive and concise language, compared to classic Java. In this part we will explore how Kotlin deals with null and null safety.

Prior to Java 8, we were left on our own to deal with the dreaded NPE. If you had a chain of calls like this:

object1.getObject2().getObject3().someMethod()

You either have to be prepared to catch an NPE since either object1, object2, or object3 may be null or you need to make sure that none of the references is null. To do that in the classic way you would have to do something pretty verbose like this:

if (object1 != null
 && object1.getObject2() != null         
 && object1.getObject2().getObject3() != null) {         

 object1.getObject2().getObject3().someMethod()
}

Now with Java 8 and the introduction of Optional, you can avoid the checking but the alternative is still somewhat verbose and requires understanding Java lambdas and streams:

object1.flatMap(Class1::getObject2)
 .map(Class2::getObject3).
 .map(Class3::someMethod());

Kotlin adopts the safe navigation operator like other modern languages such as Swift, that started around the same time, and Groovy that preceded both. The Kotlin equivalent of the Java code would be:

object1?.getObject2()?.getObject3()?. someMethod()

Pretty neat and very compact!

What is even neater is that the language forces you to make a conscious decision about how a member is initialized. If a member is initialized in the constructor, and thus can be null for part of the lifecycle of the object, you either have to:

  • Declare the variable as being nullable using a ‘?’ and delegate to Kotlin the compile time checking for proper variable usage.
  • Decorate the declaration with lateinit modifier and take over the responsibility of ensuring that the variable is initialized in time before any usage that may cause an NPE.

One might complain that avoiding the NPE is not always the right thing to do as it might be hiding other issues. Well, if you really want an NPE to be thrown when a reference is null then the ‘!!’ operator is what you need:

object1!!.getObject2()

This line will throw an NPE if object1 is null. Of course, the choice depends on the exact situation, but in all cases Kotlin forces you to make a decision and makes every reference that can be null explicit, therefore turning the runtime problem into a compile time one.

From Java to Kotlin, with Love – Part 1

Started learning Kotlin and will be writing about my initial impressions as someone who spent almost twenty years doing Java. Java has often been criticized for its verbosity and this is exactly one of the things that Kotlin is avoiding. The Kotlin language constructs allow writing very compact and expressive code, while maintaining the benefits of strong-typing.

This post discusses one simple example of that: setting a listener on a widget, which is something everyone has written in one language or another.

In Java, one would typically write:

class ClickListener implements View.OnClickListener {
    @Override
    public void onClick(View v) {
        callSomeHandler();
    }
}
widget.setListener(new ClickListener());

With that background, I started writing equivalent Kotlin code that initially looked like this:

class ContinueListener : View.OnClickListener {
    override fun onClick(v: View) {
        callSomeHandler()
    }
}
widget.setListener(ContinueListener())

This is already shorter than the corresponding Java code in a number of ways:

  1. No semi-colons are required in Kotlin.
  2. Shorter form of object construction without “new”
  3. Method return type can be omitted if it can be inferred.
  4. Instead of “implements” Kotlin uses “:”
  5. “override” is a method modifier instead of an annotation.
  6. No need to specify “public” as it is the default.

However, this is only a start. In what follows we will use Kotlin constructs to write more idiomatic Kotlin code.

First, Kotlin provides a neat shorthand for “Single-Expression Functions”. Functions composed of a single expression can be written using the “=” notation as follows:

class ContinueListener : View.OnClickListener {
    override fun onClick(v: View) = callSomeHandler()
}
widget.setListener(ContinueListener())

Lambda expressions are first-class citizens in Kotlin and there are some very interesting uses for them. This one is pretty cool: Kotlin allows passing a lambda expression to a function that accepts a single-method interface like the one at hand. So the bit of code can be greatly simplified as follows:

widget.setListener( { v: View -> callSomeHandler() } )

Now we are down to a single line!

It gets better: we are allowed to omit the parameter type as we did with omitting the function return type:

widget.setListener( { v -> callSomeHandler() } )

But we are not using the parameter? We are allowed to use the Python-like “don’t care” notation and replace the parameter with an underscore:

widget.setListener( { _ -> callSomeHandler() } )

Even better we can eliminate the left hand:

widget.setListener( { callSomeHandler() } )

One last nicety is that since the lambda expression is the only argument to the function we can eliminate the parenthesis:

widget.setListener { callSomeHandler() } 

Pretty neat!

AWS and Spring Boot Chronicles

This post chronicles some of the trials and tribulations that I had to go through to get Spring Boot to run with AWS libraries included.

  1. Added the AWS SDK to the pom. Got a NoSuchMethodError on some http connectivity method. Turns out that the SDK requires Apache HttpComponents v.4.5.3. whereas Spring Boot bundles within it an older version, perhaps even of HttpClient.
  2. Added the HttpComponents to the pom. Now I got an error that:
    LoggerFactory is not a Logback LoggerContext but Logback is on the classpath.

    Searched for a solution and found that I could just proceed by “excluding” one of them explicitly from the pom. That worked, albeit you get a warning in Eclipse about overriding the managed version.

  3. Now I was getting an error regarding NoSuchMethodError on some fasterxml Jackson classes. Sure enough, there was a version incompatibility between two versions of Jackson that were included.  I was about to include one explicitly in the pom but then I saw that there are multiple artifact IDs for Jackson libs (one for core, another for Joda).
  4. After trying to match spring library versions in vain, I resorted to including the BOM of the spring framework to get a consistent set of libraries. This fixed the incompatibilities but now some other spring boot test class was not found.
  5. After thrashing around trying to understand why it is not found even though it is clearly included, I decided to look inside the jar in the maven local repository. To my surprise, the class was actually not there. Apparently, a couple of spring boot test classes (SpringApplicationConfiguration and IntegrationTest) were Deprecated and were not even included in the jar anymore! Switching to the replacement version got me past that.
  6. Next, I ran into an error where some logging class was found twice on the classpath. I thought, well, this is another case of including a dependency twice. But it turns out that it is a bug in the JDK! I upgraded to JDK build 1.8.0_152 and that fixed it.
  7. Next, I ran into a ClasNotFoundException for this class:
    org.springframework.context.ApplicationContextInitializer

    This was another weird one. Google suggested that there was an incompatibility between the buildpack and Spring Boot 1.4! I had thereafter to start the app by explicitly specifying a build pack on the command line as such:

    cf push -b https://github.com/cloudfoundry/java-buildpack.git#v3.7
  8. After all of this, I was still getting errors starting the app. At this point I thought there must be a better way to do things. A quick search turned up the Spring AWS Cloud which provides a much better starting point!
  9. After going through another couple of build issues I was finally at the point where the app starts but it fails at the point where it needed the AWS credentials. I made a few mistakes before I got it right:
    • Added them to manifest.yaml but got an “not valid identifier” from bash since the property names contain ‘.’
    • Following this example, I added an aws-config file that looks somewhat like this but it did not seem to be picked up even after adding a corresponding resource annotation and loading the file explicitly via the classpath.
    • Now, I added them to application.properties in the format specified here and they seemed to be picked up, but I started getting an AmazonCloudFormationException complaining that the signature did not match.
    • After checking and re-checking the validity of the access key and the secret key they were correct so I had to scratch my head further.
  10. It turns out that since my app was running in Cloud Foundry in region us-west-2 the AWS SDK was attempting to connect to that region by default. However, my account was actually in us-west-1.
  11. Configuring a static region got me past this but then I ran into this issue and luckily adding the two lines:
    cloud.aws.stack.auto = false
    cloud.aws.credentials.instanceProfile = false

    to my application.properties finally got my app to start!

Now on to actually write some code!

Secure REST Services in Spring Boot

Turning on security in a Spring Boot web app is very easy. You simply add an annotation and you automatically get a whole bunch of things including Basic Authentication. Similarly, it is easy to create secure REST services in Spring Boot. To customize the authentication for these services I had to search quite a bit since it seemed that there were many ways to skin the cat. This post summarizes my findings.

To start off, I will assume maven is being used and the pom includes at least the following:


<parent>
   <groupId>org.springframework.boot</groupId>
   <artifactId>spring-boot-starter-parent</artifactId>
   <version>1.5.2.RELEASE</version>
</parent>

<dependencies>
   <dependency>
      <groupId>org.springframework.boot</groupId>
      <artifactId>spring-boot-starter-web</artifactId>
   </dependency>
   <dependency>
     <groupId>org.springframework.boot</groupId>
     <artifactId>spring-boot-starter-security</artifactId>
   </dependency>
</dependencies>

Here are the experiments that I went through to understand the effect of each change in the Spring Java configuration.

1. Basic Auth: Adding

@EnableWebSecurity

Just adding this annotation on any configuration class in your app enables Basic Authentication with the user name “user” and an auto-generated password that gets printed to the console when you run your app. Just look in the console for a line that looks like this:

 Using default security password: d735f27d-cccf-40a1-b35f-6c51552a27e6

A generated random password that changes on every restart is not very useful! So on to the next step.

2. In-memory user database: To control user names and passwords you can configure authentication by calling methods on the AuthenticationManagerBuilder. Just declare a public method on any @Configuration class and annotate it with @Autowired and configure the builder as follows:

@Configuration
@EnableWebSecurity
public class MySecurityConfig {

    @Autowired
    public void anyname(AuthenticationManagerBuilder auth) throws Exception {
        auth.inMemoryAuthentication()
            .withUser("user").password("password").roles("USER");
    }
}

This code configures an in-memory user database with a single user and the specified password.

3. Per-URL access control: So where does Basic Authentication come from. By default, once you have enabled authentication the WebSecurityConfigurerAdapter provides this method for you:

protected void configure(HttpSecurity http) throws Exception {
    http
        .authorizeRequests()
            .anyRequest().authenticated()
            .and()
        .formLogin()
            .and()
        .httpBasic();
}

You can override this method to do fine-grained access control for individual URLs depending on the user role:

@EnableWebSecurity
public class SecurityConfig extends WebSecurityConfigurerAdapter {

    @Override
    protected void configure(HttpSecurity http) throws Exception {
        http
            .authorizeRequests()
                .antMatchers("/css/**", "/index").permitAll()
                .antMatchers("/user/**").hasRole("USER");
    }
}

4. Custom Authentication: To provide your own custom authentication logic, you need to do one of two things. Either, use the @Component annotation on an implementation of AuthenticationProvider and let Spring auto-wire it:

@Component
public class MyAuthProvider implements AuthenticationProvider {

    @Override
    public Authentication authenticate(Authentication authentication) throws AuthenticationException {

        String username = authentication.getName();
        String password = authentication.getCredentials().toString();

        // your custom auth logic goes here
        // once the user is authenticated return the auth token,
        // otherwise throw an exception

        return new UsernamePasswordAuthenticationToken
            (username, password, authorities);
    }

    @Override
    public boolean supports(Class<? extends Object> authentication) {
        // you can limit the types of auth you respond to, so you may
        // limit the types to UsernamePasswordAuthenticationToken for
        // instance
        return true;
    }
}

Alternatively, in a configuration method, you can set your provider directly on the AuthenticationManagerBuilder (see #2 above).

Note that once you add a custom provider the authentication automatically switches from Basic to Form-based authentication. Spring Boot provides a default login form for you which you can override when you configure the HttpSecurity object (see #3 above)

    @Override
    protected void configure(HttpSecurity http) throws Exception {
        http
                .authorizeRequests()
                    .antMatchers("/css/**", "/index").permitAll()
                    .antMatchers("/user/**").hasRole("USER")
                    .and()
                .formLogin().loginPage("/login").failureUrl("/login-error");
    }

5. Looking up users: To lookup user information, implement your custom UserDetailsService and wire it to your authentication provider:

@Component
public class MyAuthProvider implements AuthenticationProvider {

    @Autowired
    private SwanUserDetailsService userDetailsService;

    @Override
    public Authentication authenticate(Authentication authentication) throws AuthenticationException {

        String username = authentication.getName();
        String password = authentication.getCredentials().toString();

        UserDetails user = userDetailsService.loadUserByUsername(username);

        ...
    }
}

The lookup method either succeeds or throws an exception if the user account is not found or if the password is not correct.

6. Custom Filtering: To implement a totally custom authentication, you can use request filters. This is explained in some detail here.

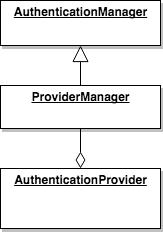
Notice that in none of the above we needed to implement our own

AuthenticationManager

. This post unnecessarily does so. Basically, Spring provides an implementation of the AuthenticationManager which is called ProviderManager which aggregates any number of AuthenticationProvider(s) and iterates over them succeeding if any of them authenticates the request (see diagram)

spring boot auth

Having gone through all these experiments, I am now ready to dive into what I really need to implement: OAuth2 authentication!

Kanban to Focus Product Development

img_2554
My experimental Kanban board

Started an experiment with Kanban to see what my board would look like. I split the board into four vertical sections: Idea, Spec, Dev, and Test. The latter three sections were split into the typical “TODO”, “Doing”, and “Done”. I did not really know what to expect except to find plenty of items in the TODO list, which was the case!

The “Idea” section was split into “Concept” and “Research”. The latter included items that are being currently researched as candidates for being added to the product. The “Concept” sub-section, on the other hand, was a bag of raw ideas that have been tossed around over the past few months, either by development, business people, or customers. What I learned from this section was interesting.

The bag of ideas in the “Concept” sub-section contained quite a large number of what seemed to be sizable projects. Looking further into these items I found that they are quite disparate and the unifying theme is not at all clear. This helped me realize that I needed to focus our product development efforts quite a bit. In trying to pick which of these items should be included and which should be deferred or rejected, I realized that the problem is at a higher level; the business level. We have been struggling for quite a while to precisely formulate our marketing message and deciding the exact customer segment to target. This reflected clearly on my board.

My first experiment with Kanban was pretty useful, and fun too!

Google Place Picker in React Native

I was facing some issues in my React Native project and was trying a few solutions. One of things that I tried was upgrading to the latest package. Even though it was a simple upgrade from 0.39 to 0.40 it turned out to be problematic. The header file organization of RN changed which require manual updates to some of the Objective-C source. After failing to fix the problem with manual update (not sure why), I decided it was easier to re-create the project from scratch using RN 0.40. After all, I should not need to do more than copy my source JavaScript files over to the new project, right? It turns out that I had forgotten about a few manual steps I had to perform in the process of setting up the project.

First, a few of the npm modules required linking. I was glad I had already documented this in a previous post.

Next, was dealing with requirements of the Google Places Picker module. Luckily, they have documentation. However, I recalled from my initial experience with the module there were some steps that were missing from the docs. Going back to my original notes, the missing steps had to do with enabling the API in the Google console, which you have to do only once (note that you have to enable more than one API).

So back to applying the steps in the docs, I needed to set up CocoaPods. The first time I set it up I got some warning about unused pods and compilation failed. It turns out that the sample pod config file provided in the docs is of an obsolete format. The file needed to look like this:

target 'places' do

  target 'placesTests' do
     inherit! :search_paths
  end

end

# react-native-google-place-picker dependencies

pod 'GooglePlacePicker', '= 2.0.1'
pod 'GooglePlaces', '= 2.0.1'
pod 'GoogleMaps', '= 2.0.1'

Once fixed, the ‘unused’ error was gone, but then I ran into linking errors of the type:

Undefined symbols for architecture x86_64

This required some searching. A line needed to be added to the Podfile that instructs CocoaPods to use an Objective-C framework, instead of plain libraries. Adding the line:

use_frameworks!

inside the ‘target’ in the Podfile fixed the problem.

Finally, I was now ready to copy my JavaScript files and get back the project to a valid state. So much for an upgrade from 0.39 to 0.40!