AWS and Spring Boot Chronicles

This post chronicles some of the trials and tribulations that I had to go through to get Spring Boot to run with AWS libraries included.

  1. Added the AWS SDK to the pom. Got a NoSuchMethodError on some http connectivity method. Turns out that the SDK requires Apache HttpComponents v.4.5.3. whereas Spring Boot bundles within it an older version, perhaps even of HttpClient.
  2. Added the HttpComponents to the pom. Now I got an error that:
    LoggerFactory is not a Logback LoggerContext but Logback is on the classpath.

    Searched for a solution and found that I could just proceed by “excluding” one of them explicitly from the pom. That worked, albeit you get a warning in Eclipse about overriding the managed version.

  3. Now I was getting an error regarding NoSuchMethodError on some fasterxml Jackson classes. Sure enough, there was a version incompatibility between two versions of Jackson that were included.  I was about to include one explicitly in the pom but then I saw that there are multiple artifact IDs for Jackson libs (one for core, another for Joda).
  4. After trying to match spring library versions in vain, I resorted to including the BOM of the spring framework to get a consistent set of libraries. This fixed the incompatibilities but now some other spring boot test class was not found.
  5. After thrashing around trying to understand why it is not found even though it is clearly included, I decided to look inside the jar in the maven local repository. To my surprise, the class was actually not there. Apparently, a couple of spring boot test classes (SpringApplicationConfiguration and IntegrationTest) were Deprecated and were not even included in the jar anymore! Switching to the replacement version got me past that.
  6. Next, I ran into an error where some logging class was found twice on the classpath. I thought, well, this is another case of including a dependency twice. But it turns out that it is a bug in the JDK! I upgraded to JDK build 1.8.0_152 and that fixed it.
  7. Next, I ran into a ClasNotFoundException for this class:
    org.springframework.context.ApplicationContextInitializer

    This was another weird one. Google suggested that there was an incompatibility between the buildpack and Spring Boot 1.4! I had thereafter to start the app by explicitly specifying a build pack on the command line as such:

    cf push -b https://github.com/cloudfoundry/java-buildpack.git#v3.7
  8. After all of this, I was still getting errors starting the app. At this point I thought there must be a better way to do things. A quick search turned up the Spring AWS Cloud which provides a much better starting point!
  9. After going through another couple of build issues I was finally at the point where the app starts but it fails at the point where it needed the AWS credentials. I made a few mistakes before I got it right:
    • Added them to manifest.yaml but got an “not valid identifier” from bash since the property names contain ‘.’
    • Following this example, I added an aws-config file that looks somewhat like this but it did not seem to be picked up even after adding a corresponding resource annotation and loading the file explicitly via the classpath.
    • Now, I added them to application.properties in the format specified here and they seemed to be picked up, but I started getting an AmazonCloudFormationException complaining that the signature did not match.
    • After checking and re-checking the validity of the access key and the secret key they were correct so I had to scratch my head further.
  10. It turns out that since my app was running in Cloud Foundry in region us-west-2 the AWS SDK was attempting to connect to that region by default. However, my account was actually in us-west-1.
  11. Configuring a static region got me past this but then I ran into this issue and luckily adding the two lines:
    cloud.aws.stack.auto = false
    cloud.aws.credentials.instanceProfile = false

    to my application.properties finally got my app to start!

Now on to actually write some code!
Secure REST Services in Spring Boot

Turning on security in a Spring Boot web app is very easy. You simply add an annotation and you automatically get a whole bunch of things including Basic Authentication. Similarly, it is easy to create secure REST services in Spring Boot. To customize the authentication for these services I had to search quite a bit since it seemed that there were many ways to skin the cat. This post summarizes my findings.

To start off, I will assume maven is being used and the pom includes at least the following:


<parent>
   <groupId>org.springframework.boot</groupId>
   <artifactId>spring-boot-starter-parent</artifactId>
   <version>1.5.2.RELEASE</version>
</parent>

<dependencies>
   <dependency>
      <groupId>org.springframework.boot</groupId>
      <artifactId>spring-boot-starter-web</artifactId>
   </dependency>
   <dependency>
     <groupId>org.springframework.boot</groupId>
     <artifactId>spring-boot-starter-security</artifactId>
   </dependency>
</dependencies>

Here are the experiments that I went through to understand the effect of each change in the Spring Java configuration.

1. Basic Auth: Adding

@EnableWebSecurity

Just adding this annotation on any configuration class in your app enables Basic Authentication with the user name “user” and an auto-generated password that gets printed to the console when you run your app. Just look in the console for a line that looks like this:

 Using default security password: d735f27d-cccf-40a1-b35f-6c51552a27e6

A generated random password that changes on every restart is not very useful! So on to the next step.

2. In-memory user database: To control user names and passwords you can configure authentication by calling methods on the AuthenticationManagerBuilder. Just declare a public method on any @Configuration class and annotate it with @Autowired and configure the builder as follows:

@Configuration
@EnableWebSecurity
public class MySecurityConfig {

    @Autowired
    public void anyname(AuthenticationManagerBuilder auth) throws Exception {
        auth.inMemoryAuthentication()
            .withUser("user").password("password").roles("USER");
    }
}

This code configures an in-memory user database with a single user and the specified password.

3. Per-URL access control: So where does Basic Authentication come from. By default, once you have enabled authentication the WebSecurityConfigurerAdapter provides this method for you:

protected void configure(HttpSecurity http) throws Exception {
    http
        .authorizeRequests()
            .anyRequest().authenticated()
            .and()
        .formLogin()
            .and()
        .httpBasic();
}

You can override this method to do fine-grained access control for individual URLs depending on the user role:

@EnableWebSecurity
public class SecurityConfig extends WebSecurityConfigurerAdapter {

    @Override
    protected void configure(HttpSecurity http) throws Exception {
        http
            .authorizeRequests()
                .antMatchers("/css/**", "/index").permitAll()
                .antMatchers("/user/**").hasRole("USER");
    }
}

4. Custom Authentication: To provide your own custom authentication logic, you need to do one of two things. Either, use the @Component annotation on an implementation of AuthenticationProvider and let Spring auto-wire it:

@Component
public class MyAuthProvider implements AuthenticationProvider {

    @Override
    public Authentication authenticate(Authentication authentication) throws AuthenticationException {

        String username = authentication.getName();
        String password = authentication.getCredentials().toString();

        // your custom auth logic goes here
        // once the user is authenticated return the auth token,
        // otherwise throw an exception

        return new UsernamePasswordAuthenticationToken
            (username, password, authorities);
    }

    @Override
    public boolean supports(Class<? extends Object> authentication) {
        // you can limit the types of auth you respond to, so you may
        // limit the types to UsernamePasswordAuthenticationToken for
        // instance
        return true;
    }
}

Alternatively, in a configuration method, you can set your provider directly on the AuthenticationManagerBuilder (see #2 above).

Note that once you add a custom provider the authentication automatically switches from Basic to Form-based authentication. Spring Boot provides a default login form for you which you can override when you configure the HttpSecurity object (see #3 above)

    @Override
    protected void configure(HttpSecurity http) throws Exception {
        http
                .authorizeRequests()
                    .antMatchers("/css/**", "/index").permitAll()
                    .antMatchers("/user/**").hasRole("USER")
                    .and()
                .formLogin().loginPage("/login").failureUrl("/login-error");
    }

5. Looking up users: To lookup user information, implement your custom UserDetailsService and wire it to your authentication provider:

@Component
public class MyAuthProvider implements AuthenticationProvider {

    @Autowired
    private SwanUserDetailsService userDetailsService;

    @Override
    public Authentication authenticate(Authentication authentication) throws AuthenticationException {

        String username = authentication.getName();
        String password = authentication.getCredentials().toString();

        UserDetails user = userDetailsService.loadUserByUsername(username);

        ...
    }
}

The lookup method either succeeds or throws an exception if the user account is not found or if the password is not correct.

6. Custom Filtering: To implement a totally custom authentication, you can use request filters. This is explained in some detail here.

Notice that in none of the above we needed to implement our own

AuthenticationManager

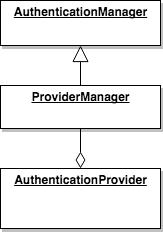
. This post unnecessarily does so. Basically, Spring provides an implementation of the AuthenticationManager which is called ProviderManager which aggregates any number of AuthenticationProvider(s) and iterates over them succeeding if any of them authenticates the request (see diagram)

spring boot auth

Having gone through all these experiments, I am now ready to dive into what I really need to implement: OAuth2 authentication!